创建工程
1 2 3 4 5 6 7 8 9 vue -V npm install -g @vue/cli vue create vue_test cd vue_testnpm run serve
vue官方文档
vite:新一代前端构建工具
优势如下:
开发环境中,无需打包操作,可快速的冷启动。
轻量快速的热重载 (HMR)。
真正的按需编译,不再等待整个应用编译完成。
传统构建与 vite 构建对比图
1 2 3 4 5 6 7 8 npm create vue@latest cd <project-name>npm install npm run dev
文件组成
文件名
作用
env.d.ts
告诉工程去认识哪些文件,比如 txt,typescript
index.html
入口文件
vite.config.ts
配置代理,安装插件等等
.eslinttrc.cjs
全局语法检查配置文件{json}'vue/multi-word-component-names': "off"
常用 Composition API
Setup
Vue3.0 中一个新的配置项,值为一个函数。setup 是所有 Composition API(组合 API)“ 表演的舞台 ”,组件中所用到的:数据、方法等等,均要配置在 setup 中。
setup 函数的两种返回值:
若返回一个对象,则对象中的属性、方法, 在模板中均可以直接使用。(重点关注!)
若返回一个渲染函数:则可以自定义渲染内容(了解)
1 2 3 4 5 6 7 8 9 10 11 12 13 14 15 16 17 18 19 20 21 22 23 24 25 26 <script > export default { name : 'App' , setup ( let name='张三' ; let age=18 ; function sayHello ( alert (`Hello, ${name} !` ); } return { name, age, sayHello }, return ()=> h ('h1' ,'wxg' ) } } </script > <template > <h1 > 姓名:{{ name }},年龄:{{ age }}</h1 > <button @click ="sayHello()" > 欢迎</button > </template >
attention: >1. 尽量不要与 Vue2.x 配置混用
语法糖
安装插件 npm i vite-plugin-vue-setup-extend -D
1
2
3
4
5
6
7
8
9
10
11
12
13
14
15
16
17
18
19
import { fileURLToPath, URL } from 'node:url' import { defineConfig } from 'vite' import vue from '@vitejs/plugin-vue' import vueDevTools from 'vite-plugin-vue-devtools' import VueSetupExtend from 'vite-plugin-vue-setup-extend' export default defineConfig ({ plugins : [ vue (), vueDevTools (), VueSetupExtend () ], resolve : { alias : { '@' : fileURLToPath (new URL ('./src' , import .meta .url )) } } })
1 2 3 <script setup name ="Person" > ... </script >
ref 函数
定义一个响应式的数据
语法: const xxx = ref(initValue) ,创建一个包含响应式数据的引用对象(reference 对象,简称 ref 对象)。
JS 中操作数据: xxx.value
模板中读取数据: 不需要.value,直接:{html}<div>{{xxx}}</div>
1 2 3 4 5 6 7 8 9 10 11 12 13 14 15 16 17 18 19 <script > let name = ref ('张三' );let age = ref (18 );let job = ref ({ salary :'50k' , title :'嵌入式工程师' , }); function changeInfo ( name.value = '李四' ; age.value = 48 ; job.value .salary = '60k' ; job.value .title = '全栈工程师' ; } </script > <template > <h1 > 姓名:{{ name }},年龄:{{ age }},工作岗位{{ job.title }},工资{{ job.salary }}</h1 > </template >
note: >- 接收的数据可以是:基本类型、也可以是对象类型。
基本类型的数据:响应式依然是靠 Object.defineProperty() 的 get 与 set 完成的。
对象类型的数据:内部“ 求助 ”了 Vue3.0 中的一个新函数—— reactive 函数。
reactive 函数
定义一个对象类型 的响应式数据(基本类型不要用它 ,要用 ref 函数)
语法: const 代理对象= reactive(源对象),接收一个对象(或数组),返回一个代理对象(Proxy 的实例对象,简称 proxy 对象)
reactive 定义的响应式数据是“深层次的”。内部基于 ES6 的 Proxy 实现,通过代理对象操作源对象内部数据进行操作。
1 2 3 4 5 6 7 8 9 10 11 12 13 14 15 16 17 import { ref,reactive } from "vue" ;let job = reactive ({ salary :'50k' , title :'嵌入式工程师' }); let hobby=reactive (['篮球' ,'足球' ,'乒乓球' ]);function changeInfo ( name.value = '李四' ; age.value = 48 ; job.salary = '60k' ; job.title = '全栈工程师' ; hobby[0 ]="吃饭" ; } <h1>工作岗位{{ job.title }},工资{{ job.salary }},爱好:{{hobby}}</h1>
reactive 与 ref 对比
对比
ref
reactive
定义数据角度
基本类型数据 (ref 也可以用来定义对象或数组类型数据, 它内部会自动通过 reactive 转为代理对象)。对象或数组类型数据
原理角度
通过 Object.defineProperty() 的 get 与 set 来实现响应式(数据劫持)
通过使用Proxy 来实现响应式(数据劫持), 并通过Reflect 操作源对象 内部的数据。
使用角度
操作数据需要 .value,读取数据时模板中直接读取不需要 .value
操作数据与读取数据:均不需要 .value
响应式原理
Vue2.x 响应式
对象类型:通过 Object.defineProperty() 对属性的读取、修改进行拦截(数据劫持)。
数组类型:通过重写更新数组的一系列方法来实现拦截。(对数组的变更方法进行了包裹)。
1
2
3
4
Object .defineProperty (data, 'count' , { get () {}, set () {} })
存在问题:
新增属性、删除属性, 界面不会更新。
直接通过下标修改数组, 界面不会自动更新。
Vue3 响应式
通过 Proxy (代理): 拦截对象中任意属性的变化, 包括:属性值的读写、属性的添加、属性的删除等。
通过 Reflect (反射): 对源对象的属性进行操作。
1
2
3
4
5
6
7
8
9
10
11
12
13
14
15
new Proxy (data, { get (target, prop) { return Reflect .get (target, prop) }, set (target, prop, value) { return Reflect .set (target, prop, value) }, deleteProperty (target, prop) { return Reflect .deleteProperty (target, prop) } }) proxy.name = 'tom'
setup 注意点
setup 执行的时机:在 beforeCreate 之前执行一次,this 是 undefined。
setup 的参数:
props:值为对象,包含:组件外部传递过来,且组件内部声明接收了的属性。
context:上下文对象
attrs: 值为对象,包含:组件外部传递过来,但没有在 props 配置中声明的属性, 相当于 this.$attrs。
slots: 收到的插槽内容, 相当于 this.$slots。
emit: 分发自定义事件的函数, 相当于 this.$emit。
fold 1 2 3 setup (props,context ){ ... }
计算属性
与 Vue2.x 中 computed 配置功能一致,写法如下:
1 2 3 4 5 6 7 8 9 10 11 12 13 14 15 16 17 18 19 20 21 import {computed} from 'vue' setup ( ... let fullName = computed (()=> { return person.firstName + '-' + person.lastName }) let fullName = computed ({ get ( return person.firstName + '-' + person.lastName }, set (value ){ const nameArr = value.split ('-' ) person.firstName = nameArr[0 ] person.lastName = nameArr[1 ] } }) }
监视属性
与 Vue2.x 中 watch 配置功能一致,需要注意以下两点:
监视 reactive 定义的响应式数据时:oldValue 无法正确获取、强制开启了深度监视(deep 配置失效)。
监视 reactive 定义的响应式数据中某个属性时:deep 配置有效。
1 2 3 4 5 6 7 8 9 10 11 12 13 14 15 16 17 18 19 20 21 22 23 24 25 26 27 28 29 30 31 32 33 34 35 import {watch} from 'vue' watch (sum,(newValue,oldValue )=> { console .log ('sum变化了' ,newValue,oldValue) },{immediate :true }) watch ([sum,msg],(newValue,oldValue )=> { console .log ('sum或msg变化了' ,newValue,oldValue) }) watch (person,(newValue,oldValue )=> { console .log ('person变化了' ,newValue,oldValue) },{immediate :true ,deep :false }) watch (()=> person.job ,(newValue,oldValue )=> { console .log ('person的job变化了' ,newValue,oldValue) },{immediate :true ,deep :true }) watch ([()=> person.job ,()=> person.name ],(newValue,oldValue )=> { console .log ('person的job变化了' ,newValue,oldValue) },{immediate :true ,deep :true }) watch (()=> person.job ,(newValue,oldValue )=> { console .log ('person的job变化了' ,newValue,oldValue) },{deep :true })
watchEffect
watch 的套路是:既要指明监视的属性,也要指明监视的回调。而watchEffect 的套路是:不用指明监视哪个属性,监视的回调中用到哪个属性,那就监视哪个属性。
watchEffect 有点像 computed:但computed 注重的计算出来的值 (回调函数的返回值),所以必须要写返回值。而watchEffect 更注重的是过程 (回调函数的函数体),所以不用写返回值。
1 2 3 4 5 6 watchEffect (()=> { const x1 = sum.value const x2 = person.age console .log ('watchEffect配置的回调执行了' ) })
defineProps
在不使用 setup 语法糖的情况下与 Vue2 中的 props 基本一致,在 typescript 的写法下可以限定接收到的数据以及类型
1 2 3 4 5 6 7 8 9 10 11 12 interface Person { id :number , name :string } type Persons = Array <Person >;import {defineProps,withDefaults}const props=withDefaults (defineProps<list ?:Person >(),{ list :()=> [{id :1 ,name :"默认值" }] }) console .log (props.title )
使用 :Person 指定类型
使用 ? 来制定是否必要
使用 withDefaults 指定默认值
note: 类似 defineProps 这种是不需要引用的
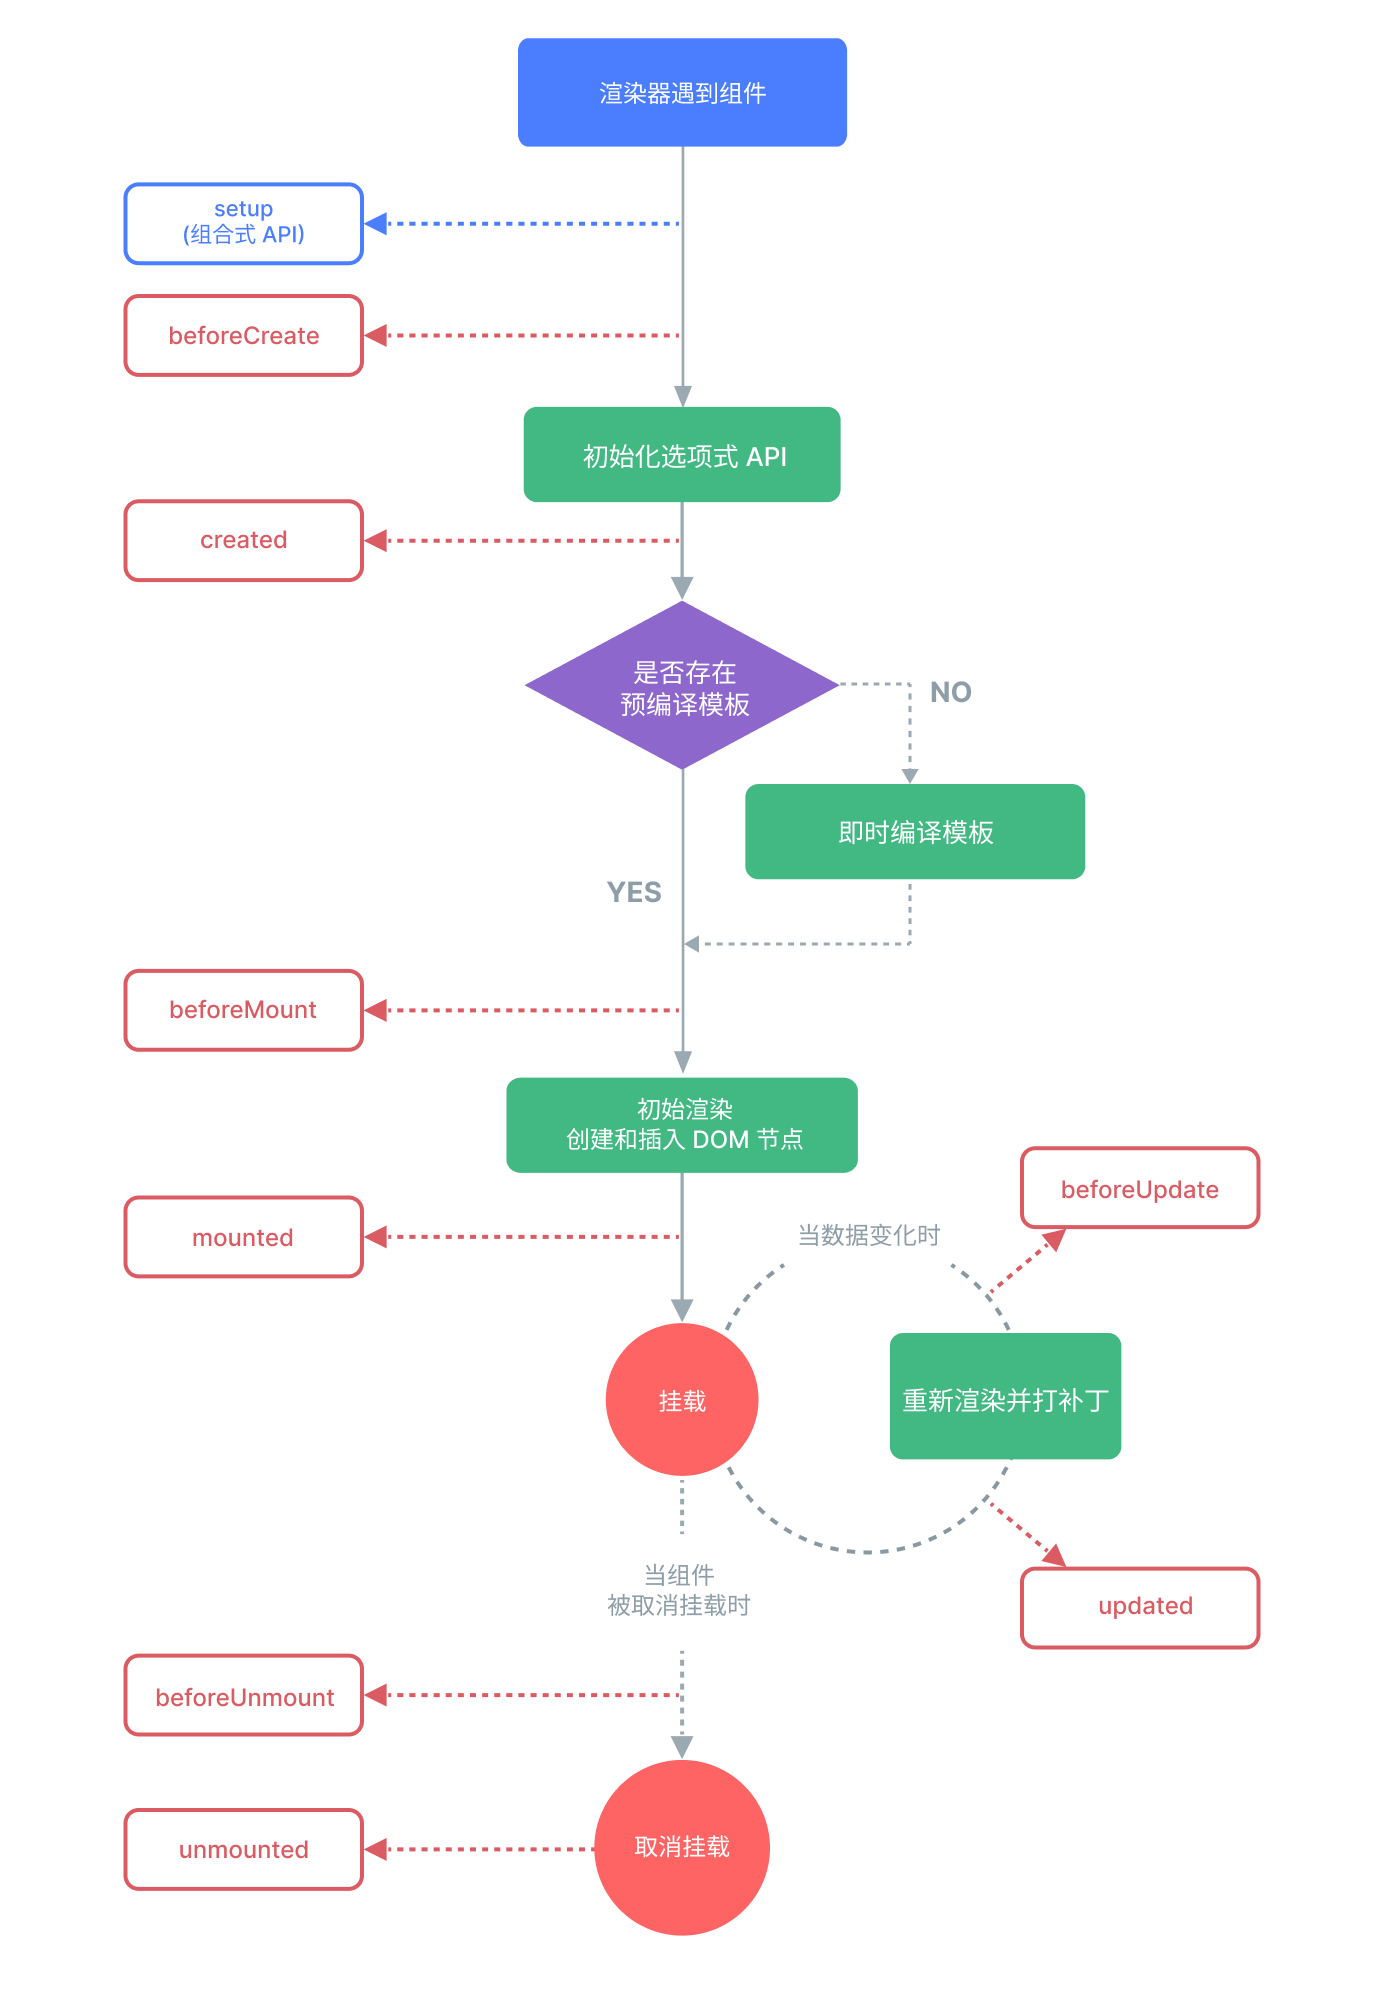
生命周期
Vue3.0 中可以继续使用 Vue2.x 中的生命周期钩子,但有有两个被更名:
Vue2
Vue3
beforeDestroy
beforeUnmount
destroyed
unmounted
Vue3.0 也提供了 Composition API 形式的生命周期钩子,与 Vue2.x 中钩子对应关系如下:
Vue2
Vue3
beforeCreate
setup()
created
setup()
beforeMount
onBeforeMount
mounted
onMounted
beforeUpdate
onBeforeUpdate
updated
onUpdated
beforeUnmount
onBeforeUnmount
unmounted
onUnmounted
自定义 hook 函数
本质是一个函数,把 setup 函数中使用的 Composition API 进行了封装,类似于 vue2.x 中的 mixin ,其优势在于: 复用代码, 让 setup 中的逻辑更清楚易懂。具体是在另一个文件中
1 2 3 4 5 6 7 8 9 10 import {...} from 'vue' export default function ( let point=reactive ({ ... }) function savePoint (event ){ ... } return point }
1 2 3 4 5 6 import usePoint from '../hooks/功能块' setup ( let sum = ref (0 ); let point = usePoint (); return {sum,point} }
toRef
作用是创建一个 ref 对象,其 value 值指向另一个对象中的某个属性: const name = toRef(person,'name'),在要将响应式对象中的某个属性单独提供给外部使用时调用,toRefs 与 toRef 功能一致,但可以批量创建多个 ref 对象(仅能创建第一层,也就是浅),语法:toRefs(person)
1 2 3 4 5 6 7 8 9 10 11 12 13 14 15 16 17 18 19 20 21 22 23 24 <script> export default { name : 'App' , setup ( let person=reactive ({ name :"张三" , age :18 , ... }) return { person, name : toRef (person,'name' ), age : toRef (person,'age' ), ...toRefs (person) }, } } </script> <template > <h1 > 姓名:{{ name }},年龄:{{ age }}</h1 > </template >
组件间通信
组件间通信的方法整体可以参考 组件间通信 ,注意 props 的变化
自定义事件
1 2 3 4 5 6 7 8 9 <template > <Child @wxg ="test" /> </template > <script > function test (value ){ console .log (value) } </script >
1 2 3 4 5 6 <script > const emit = defineEmits (['wxg' ]) emit ('haha' ,666 ) </script >
mitt
创建一个文件在其中进行一些事件的绑定,在特定的时间去触发对应的事件即可
1 2 3 4 5 6 7 8 9 10 11 12 13 14 15 16 17 import mitt from 'mitt' const emitter = mitt ()emitter.on ('event1' , (data ) => { console .log ('data1:' , data) }) emitter.emit ('event1' , 'hello world' ) emitter.off ('eventq' ); emitter.all .clear (); export default emitter
1 2 import emitter from '@/utils/emitter'
v-model
其底层原理为动态 value 值配合上 input 事件来实现的
1 2 3 4 5 6 7 8 9 10 <input type ="text" v-model ="username" > <input type ="text" :value ="username" @input ="username= (<HtmlInputElement>$event.target).value" > <WxgInput v-model ="username" /> <WxgInput :modelValue ="username" @update:modelValue ="username=$event" /> <WxgInput :value ="username" @input ="username=$event" /> <WxgInput v-model:mima ="username" />
1 2 3 4 5 6 7 8 9 10 11 <template > <input type ="text" :value ="modelValue" @input ="emit('update:modelValue',(<HtmlInputElement>$event.target).value)" > </template > <script > defineProps (['modelValue' ]) defineEmits (['update:modelValue' ]) </script >
note: 对于原生事件,$event 就是事件对象; 对于自定义事件,$event 就是触发事件时,所传递的数据
$attrs
主要是祖孙之间传输数据,对于父组件传输的过多的数据,而子组件未使用的会放到 $attrs 中
1 2 3 4 5 6 7 8 9 <Child :a ="a" v-bind ="{x:100,y:200}" /> <GrandChild v-bind ="$attrs" > <h1 > {{x}},{{a}}</h1 > <script > defineProps (['a' ,'x' ]) </script >
$refs 和 $parent一般情况下我们可以给一个子组件打标签,加上属性 ref='attrVal',而后通过一个变量来进行承接 let attrVal=ref(),同时在子组件中使用 defineExpose 宏方法将想要交出去的变量变量暴露出去 defineExpose({val1,...}),这时就可以通过 attrVal.value.val1 来对子组件的数据进行改变
但是这样的方法在子组件特别多时会显得比较臃肿,此时就可以借助 $refs 作为函数变量来获取所有的子组件的实例对象,同时在子组件中可以使用 $parent 来读取父组件实例对象,注意提供数据的组件要先暴露
1 2 3 4 5 6 7 8 9 10 11 12 13 14 15 16 17 18 19 20 21 22 23 24 25 26 27 28 29 30 31 32 33 34 35 36 37 38 <script setup lang ="ts" name ="Father" > import { ref } from 'vue' ;import Child1 from '@/components/Child1.vue' ;import Child2 from '@/components/Child2.vue' ;let house = ref (4 );let c1 = ref ();let c2 = ref ();defineExpose ({ house })function changeToy ( c1.value .toy = 'ball' } function changeComputer ( c2.value .computer = 'Mac' } function getAllChild (refs: { [key: string]: any } ) { for (let key in refs) { refs[key].book += 3 } } </script > <template > <div class ="father" > <h4 > Father</h4 > <h4 > 房产:{{ house }}</h4 > <button @click ="changeToy()" > 修改儿子1玩具</button > <button @click ="changeComputer()" > 修改儿子2电脑</button > <button @click ="getAllChild($refs)" > 获取所有子组件</button > <Child1 ref ="c1" /> <Child2 ref ="c2" /> </div > </template > <style scoped > .father { background-color : skyblue; border-width : 5px ; } </style >
1 2 3 4 5 6 7 8 9 10 11 12 13 14 15 16 17 18 19 20 21 22 23 24 <script setup lang ="ts" name ="Child1" > import { ref } from 'vue' ;let toy = ref ('奥特曼' )let book = ref (3 )defineExpose ({ toy, book })function minusHouse (parent: any ) { parent.house -= 1 } </script > <template > <div class ="child1" > <h4 > Child1</h4 > <h4 > 玩具:{{ toy }}</h4 > <h4 > 书籍:{{ book }}</h4 > <button @click ="minusHouse($parent)" > 干掉一套房产</button > </div > </template > <style scoped > .child1 { background-color : orange; } </style >
1 2 3 4 5 6 7 8 9 10 11 12 13 14 15 16 17 18 19 <script setup lang ="ts" name ="Child2" > import { ref } from 'vue' ;let computer = ref ('华为' )let book = ref (6 )defineExpose ({ computer, book })</script > <template > <div class ="child2" > <h4 > Child1</h4 > <h4 > 玩具:{{ computer }}</h4 > <h4 > 书籍:{{ book }}</h4 > </div > </template > <style scoped > .child2 { background-color : red; } </style >
其它 Composition API
shallowReactive:只处理对象最外层属性的响应式(浅响应式),如果有一个对象数据,结构比较深, 但变化时只是外层属性变化时使用
shallowRef:只处理基本数据类型的响应式, 不进行对象的响应式处理,如果有一个对象数据,后续功能不会修改该对象中的属性,而是生新的对象来替换,直接替换源数据
1 2 3 4 const x=shallowRef ({ y :0 })
readonly: 让一个响应式数据变为只读的(深只读)。
shallowReadonly:让一个响应式数据变为只读的(浅只读)。
1 2 3 4 5 6 7 8 9 10 11 12 let person=readonly (reactive ({ name :"张三" , age :18 , ... })) let person=shallowReadonly (reactive ({ name :"张三" , age :18 , ... }))
toRaw:将一个由 reactive 生成的响应式对象 转为普通对象 ;用于读取响应式对象对应的普通对象,对这个普通对象的所有操作,不会引起页面更新。
markRaw:标记一个对象,使其永远不会再成为响应式对象。在有些值不应被设置为响应式的,例如复杂的第三方类库等。或者当渲染具有不可变数据源的大列表时,跳过响应式转换可以提高性能。
1 2 3 4 5 6 7 8 9 10 11 let person=reactive ({ name :"张三" , age :18 , ... }) const pRaw=toRaw (person)function addCar ( let car={name :"奔驰" ,price :40 } person.car =markRaw (car) }
customRef:创建一个自定义的 ref,并对其依赖项跟踪和更新触发进行显式控制。实现防抖效果的示例如下:
1 2 3 4 5 6 7 8 9 10 11 12 13 14 15 16 17 18 19 20 21 22 23 24 25 26 27 28 29 30 31 32 33 34 35 36 37 38 <template > <input type ="text" v-model ="keyword" > <h3 > {{keyword}}</h3 > </template > <script > import {ref,customRef} from 'vue' export default { name :'Demo' , setup ( function myRef (value,delay ){ let timer return customRef ((track,trigger )=> { return { get ( track () return value }, set (newValue ){ clearTimeout (timer) timer = setTimeout (()=> { value = newValue trigger () },delay) } } }) } let keyword = myRef ('hello' ,500 ) return { keyword } } } </script >
- provide 与 inject:实现**祖与后代组件间**通信,父组件有一个 `provide` 选项来提供数据,后代组件有一个 `inject` 选项来开始使用这些数据,具体写法如下:
1 2 3 4 5 6 7 8 9 import {provide,...} from 'vue' ;setup ( ...... let money=ref (100 ) provide ('money' ,money) let car = reactive ({name :'奔驰' ,price :'40万' }) provide ('car' ,car) ...... }
1 2 3 4 5 6 7 import {inject,...} from 'vue' ;setup (props,context ){ ...... const car = inject ('car' ,默认值) return {car} ...... }
响应式数据的判断
isRef: 检查一个值是否为一个 ref 对象
isReactive: 检查一个对象是否是由 reactive 创建的响应式代理
isReadonly: 检查一个对象是否是由 readonly 创建的只读代理
isProxy: 检查一个对象是否是由 reactive 或者 readonly 方法创建的代理
1 2 3 4 5 6 7 let car=reactive ({name :'奔驰' ,price :"40w" })let sum=ref (0 )let car2=readonly (car)console .log (isRef (sum))console .log (isReactive (car))console .log (isReadonly (car2))console .log (isProxy (car))
Composition API 的优势
Options API 存在的问题: 使用传统 OptionsAPI 中,新增或者修改一个需求,就需要分别在 data,methods,computed 里修改 。
Composition API 的优势: 我们可以更加优雅的组织我们的代码,函数。让相关功能的代码更加有序的组织在一起。
新的组件
1. Fragment
在 Vue2 中: 组件必须有一个根标签
在 Vue3 中: 组件可以没有根标签, 内部会将多个标签包含在一个 Fragment 虚拟元素中
好处: 减少标签层级, 减小内存占用
2.Teleport
什么是 Teleport?—— Teleport 是一种能够将我们的组件 html 结构 移动到指定位置的技术。
1 2 3 4 5 6 7 8 <teleport to ="移动位置" > <div v-if ="isShow" class ="mask" > <div class ="dialog" > <h3 > 我是一个弹窗</h3 > <button @click ="isShow = false" > 关闭弹窗</button > </div > </div > </teleport >
3.Suspense
等待异步组件时渲染一些额外内容,让应用有更好的用户体验,使用步骤:
异步引入组件
1 2 3 import {defineAsyncComponent} from 'vue' const Child = defineAsyncComponent (()=> import ('./components/Child.vue' ))
使用 Suspense 包裹组件,并配置好 default 与 fallback,fallback 为因网络未正常显示时显示的内容
1 2 3 4 5 6 7 8 9 10 11 12 13 <template > <div class ="app" > <h3 > 我是App组件</h3 > <Suspense > <template v-slot:default > <Child /> </template > <template v-slot:fallback > <h3 > 加载中.....</h3 > </template > </Suspense > </div > </template >
其他
1.全局 API 的转移
Vue 2.x 有许多全局 API 和配置。例如:注册全局组件、注册全局指令等。
1 2 3 4 5 6 7 8 9 10 11 12 Vue .component ('MyButton' , { data : () => ({ count : 0 }), template : '<button @click="count++">Clicked {{ count }} times.</button>' }) Vue .directive ('focus' , { inserted : el =>focus () }
Vue3.0 中对这些 API 做出了调整:将全局的 API,即:Vue.xxx 调整到应用实例(app)上
2.x 全局 API(Vue)
3.x 实例 API (app)
Vue.config.xxxx
app.config.xxxx
Vue.config.productionTip
移除
Vue.component
app.component
Vue.directive
app.directive
Vue.mixin
app.mixin
Vue.use
app.use
Vue.prototype
(不推荐) app.config.globalProperties
Vue.mount
app.mount
Vue.unmount
app.unmount
2.非兼容性改变
data 选项应始终被声明为一个函数。
过度类名的更改:
1 2 3 4 5 6 7 8 .v-enter ,.v-leave-to { opacity : 0 ; } .v-leave ,.v-enter-to { opacity : 1 ; }
1 2 3 4 5 6 7 8 9 .v-enter-from ,.v-leave-to { opacity : 0 ; } .v-leave-from ,.v-enter-to { opacity : 1 ; }
移除 keyCode 作为 v-on 的修饰符,同时也不再支持 config.keyCodes
移除 v-on.native 修饰符1 2 3 4 <my-component v-on:close ="handleComponentEvent" v-on:click ="handleNativeClickEvent" />
子组件中声明自定义事件 1 2 3 4 5 <script > export default { emits : ['close' ] } </script >
移除过滤器(filter)
过滤器虽然这看起来很方便,但它需要一个自定义语法,打破大括号内表达式是 “只是 JavaScript” 的假设,这不仅有学习成本,而且有实现成本!建议用方法调用或计算属性去替换过滤器。
路由
主要参考 Vue2 中的 路由 进行配置,下面介绍一些不同项
1 2 3 4 5 6 7 8 9 10 11 12 13 14 15 16 import { createRouter, createWebHistory } from 'vue-router' export default createRouter ({ history : createWebHistory (), routes : [ { path : '/about' , component : () => import ('../components/About.vue' ) }, { path : '/home' , component : () => import ('../components/Home.vue' ) } ] })
1 2 3 4 5 6 7 8 9 10 11 12 13 14 import './assets/main.css' import { createApp } from 'vue' import App from './App.vue' import router from './router/' const app = createApp (App )app.use (router) app.mount ('#app' )
1 2 3 4 5 6 7 8 9 10 11 12 13 <script setup lang ="ts" name ="App" > import { RouterView } from "vue-router" ;</script > <template > <h1 > APP</h1 > <router-link to ="/home" > Home</router-link > <router-link to ="/about" > About</router-link > <br > <RouterView > </RouterView > </template > <style scoped > </style >
重定向
目的是在打开网址时默认显示的界面,仅需要在路由规则中再加入如下规则即可
1 2 3 4 5 6 7 8 9 10 11 12 13 14 export default createRouter ({ history : createWebHistory (), routes : [ { path : '/home' , component : () => import ('../components/Home.vue' ) }, ... { path :'/' , redirect :'/home' } ] })
Pinia
其和 react 中的 redux 以及 vue2 中使用的 Vuex 一样都是一种集中式状态管理工具
安装
安装 Pinia: npm i pinia, 在 main.ts 中安装引入
1 2 3 4 5 6 7 8 9 10 11 import './assets/main.css' import { createApp } from 'vue' import App from './App.vue' import { createPinia } from 'pinia' const app = createApp (App )const pinia = createPinia ()app.use (pinia) app.mount ('#app' )
存取数据
1 2 3 4 5 6 7 8 9 10 11 12 import { defineStore } from 'pinia' export const useTalkStore = defineStore ('loveTalk' , { state : () => ({ talkList : [ { id : 'ftrfasdf01' , title : '今天你有点怪,哪里怪?怪好看的!' }, { id : 'ftrfasdf2' , title : '草莓、蓝莓、蔓越莓,今天想我了没?' }, { id : 'ftrfasdfo3' , title : '心里给你留了一块地,我的死心塌地' } ] }), actions : {} })
1 2 3 4 5 6 7 8 9 10 11 12 <script setup lang ="ts" > import { useTalkStore } from '@/store/loveTalk' ;const talkStore = useTalkStore ();console .log (countStore.sum );console .log (countStore.$state .sum );</script > <template > <ul > <li v-for ="(talk, index) in talkStore.talkList" :key ="talk.id" > {{ talk.title }}</li > </ul > </template >
修改数据
1 2 3 4 5 6 7 8 9 10 11 12 import { defineStore } from 'pinia' export const useCountStore = defineStore ('count' , { state : () => ({ sum : 0 , address : '众星之上' }), actions : { increment (value : number this .sum += value } } })
1 2 3 4 5 6 7 8 9 10 11 12 const countStore = useCountStore ();function add ( countStore.sum += n.value ; countStore.$patch({ sum : 888 , address : '万星' }) countStore.increment (n.value ); }
storeToRefs
为了避免在调用时总是需要加上对象名,为此我们可以使用前面提到的 toRefs 方法,但是该方法会使得所有的属性,包括函数都会被转成 refImpl 类型,这不是我们想要的,这是可以使用 pinia 中提供的 storeToRefs 方法,其仅关注其中的 state 属性变量
1 import {storeToRefs} from 'pinia'
getters
参考 vuex 中提到的 getters ,作用和计算属性差不多
1 2 3 4 5 6 7 8 9 10 11 12 import { defineStore } from 'pinia' export const useCountStore = defineStore ('count' , { state : () => ({ sum : 0 , address : '众星之上' }), ... getters : { bigSum :state =>return state.sum * 10 , } })
subscribe
对消息和数据进行订阅,接收两个参数:mutate 本次修改信息,state 真正的数据
1 2 3 4 5 6 7 8 9 10 talkStore.$subscribe((mutation, state ) => { localStorage .setItem ('talkList' , JSON .stringify (state.talkList )); }) export const useTalkStore = defineStore ('loveTalk' , { state : () => ({ talkList : JSON .parse (localStorage .getItem ('talkList' ) as string ) || [] }), ... })
组合式 store
整个结构就类似于 setup 函数,此时其中的数据就相当于 state,函数就相当于 actions
1 2 3 4 5 6 7 8 9 10 11 12 13 14 15 16 import { defineStore } from 'pinia' import axios from 'axios' import { nanoid } from 'nanoid' import { reactive } from 'vue' export const useTalkStore = defineStore ('loveTalk' , () => { const talkList = reactive (JSON .parse (localStorage .getItem ('talkList' ) as string ) || []) async function getLoveTalk ( let { data : { content : title } } = await axios.get ('https://api.uomg.com/api/rand.qinghua?format=jsor' ) let obj = { id : nanoid (), title } talkList.unshift (obj) } return {talkList,getLoveTalk} })